Okay, so you want to keep bees? Great, but how do you start? What equipment do you need? Where do you get the bees? It may seem like a daunting task, but break it down and don’t get put off!
 First, look for a mentor. It could be an individual or an organization. The best way to connect with other folks crazy enough to want to keep bees is to join your local beekeeping association. PSBA offers a network of neighborhood captains who have offered to provide advice and guidance to beekeepers in between the monthly meetings of PSBA, there’s probably one who lives near you! (Join PSBA!) Look for an association in your county- Washington State Beekeeper’s association offers a list of associations in our area if PSBA isn’t close to you. If you live in a large city, there may be several groups devoted to bees. It is as easy as putting your city or county + beekeeping into a web browser. Find the meeting place and jump right in. You can attend most meetings without joining (membership to local associations are usually really reasonable, under $20 for the entire year). You will want to join to take advantage of all the perks (like mentors, renting extractors, education, etc.)
Next, find out where to order bees. Most clubs will have some package bee suppliers, who offer their bees to the club. PSBA, for instance, is sponsored by a couple of vendors selling packages – if you purchase from them, PSBA benefits with donations of bees to our apiary. Most folks think they want to start with one hive, but I recommend starting with 2. The main reason is: if anything happens to your queen in one hive, the hive is doomed. With 2 hives you can “borrow” a frame of eggs from your second hive and let the bees make a new queen. Nifty, huh? Now, what is a package? It consists of a queen in her own little cage and about 3 pounds of bees. There are several different types of honeybees, so you should buy what works well in your location. This is another good reason to join a beekeepers association. You can get this information there! Most people will go with Italian bees, but if you are in a cold area you might do better with Carniolans or Russians. They have different characteristics, which you will learn about in time. The cost of a package in 2015 is about $130.
Next, get a few books from the library on beekeeping or subscribe to beekeeping magazines such as American Beekeeping Journal or Bee Culture. For books, I suggest Beekeeping for Dummies and the Beekeepers Handbook. Read, read, read. Stick with books that are new for now, since the sections on pests and diseases need to be pertinent to beekeeping today.
Now for the equipment you need for yourself and for the bees. Getting started will cost you quite a bit, so make sure this hobby is really what you want to do! Start with what YOU need: a hive tool, gloves, a smoker, a veil and maybe a suit. Where do you get these things? If you live in a big city, there may be a bee supply store you can visit. If not, ask folks at your bee association, or search the web. PSBA’s list of resources is here. Many companies have catalogs that they will send you for free. These are as good as seed catalogs to get you through a cold, dreary winter! Remember that shipping is going to be added to your order, so companies like Mann Lake, LTD are great, because with a $100 order, the shipping is FREE.
My favorite hive tool has a hook on the end, which is useful when prying a sticky frame up out of the box. Eventually you will want a second hive tool with a curved lip on one end, because it is best for scraping equipment. Next you need a smoker. If you only have a couple of hives, choose a smaller size. Now, many stores will want to sell you leather gloves, however, dishwashing gloves offer as much protection and cost a whole lot less. Okay, you are almost dressed, but do you need a suit? Blue jeans and a light colored long sleeve shirt will do fine. Just duct tape the legs and arms so crawling bees don’t get inside. A few don’ts: don’t wear black, red or fuzzy! Bees see ultraviolet and red looks black and black in their genetics means BEAR! Fuzzy means the same. A veil is very important to keep the bees out of your hair and face. There are many to choose from and it really is up to you, which style you pick. I like the ones that are all in one with the hoop over your head and the face area covered by mesh. There are strings at the bottom which allow you to gather it together to keep bees from crawling up inside. There, that wasn’t too hard, was it?
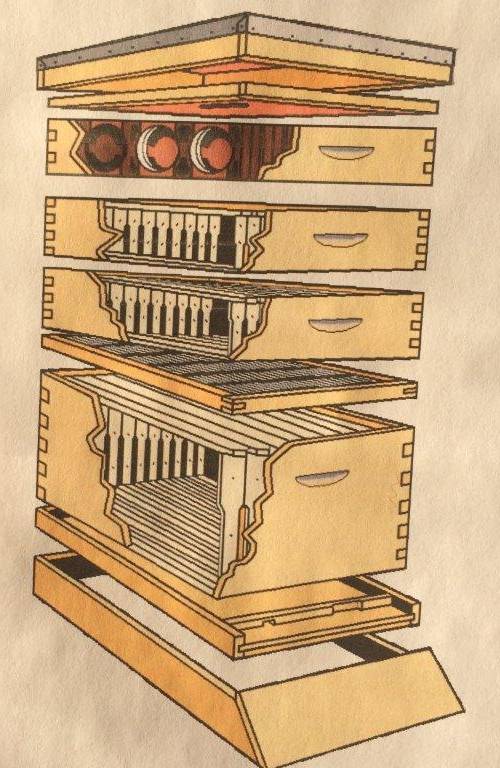
So you have ordered bees and have your tools of the trade, what do you do as far as housing your bees. Having done this for a while, I have made some changes to the way I started.
Hive Bodies: Having the bees and brood in 2 deep boxes and having medium boxes for the honey. (These are often referred to as supers) Weight was a huge factor in my changes. The deeps can weigh up to 80 pounds and the mediums about 40. Do you see where I’m going with this? Weightlifting! I now keep bees in all MEDIUM BOXES. Besides being able to lift, it means all the frame sizes are the same and everything is INTERCHANGEABLE. If you keep bees old school, you need 2 deeps and 3 mediums. Go my way and you use 3 mediums for the brood area and 3 mediums for honey storage. The bees don’t care. They move up in hollow trees and they move up in deeps or mediums. In addition you can choose 8 frame equipment or 10 frame. Obviously, the 8 frame will be even less weight.
Top Cover/Bottom Board: There are several types of tops: migratory (which are used by commercial beeks, because they can sit seamlessly side by side on pallets), telescoping (which us regular folks use, because it keeps water from getting in) and then there are the beautiful Garden Tops, which are peaked, look pretty and even come in copper. (These are lovely, but don’t work well if, like me, you use the top -upside down- to stack equipment on when inspecting a hive. This method holds any bees that might otherwise get lost in the grass and get squished. This bee could be a QUEEN.) Some migratory tops come with inner covers. These are nice to add an extra layer of protection to the top box and can be used to cover the boxes when doing an inspection.
Now, bottom boards: a couple of types to consider: screened and solid. I recommend screened, because the Varroa mite, which is a big problem with bees, can fall through the screen and not be able to get back in the boxes. A solid bottom board means the mites just wait for another bee to walk by and they then hitch hike a ride back up inside the box. One smaller piece of equipment is an entrance reducer, which is handy when you start out, to keep the opening small so the bees can more easily defend the hive against intruders. The entrance reducer is so important in the summer to help the bees defend against yellow jackets.
Costs: So, how much are you spending? Probably another $700 for two hives, on top of the cost of bees.
I haven’t mentioned that you can buy the boxes and frames already built, or buy ones you assemble yourself. I like to build my own equipment. PSBA is offering a FREE equipment building workshop! When assembling equipment – make sure you use glue in addition to nails. You can order both of these through the catalog. Obviously the ready-made will cost more. Do it yourself and help pass the time until your bees arrive, which will be sometime in April for most areas.
Now that you have the facts, I hope you still decide to keep honeybees. It can be one of the most fascinating and rewarding hobbies.